We need to fix a number of problems before we can start to pose
Ana.
This is done in the Setup panel below the Import File button. The Setup
panel is arranged in chronological order. You don't have to carry out
the tasks in exactly this order, but some steps are destructive and make
it impossible to go back. Buttons that logically belong together are
grouped into boxes, which are described in the various sections of this
document.
Corrections
Each
piece of clothing is equipped with its own armature. Normally we want
to join all armatures which control both the character and all clothes.
The Merge Rigs button merges all selected rigs to the active one. Since
the main character rig is usually active after import, the quick way to
do this is to press A-key twice (to deselect and select everything) and
then press Merge Rigs.
However, some armatures require special
attention, due to additional bones and foot poses.
We
see the rigs in the outliner. The
character rig is simply called Ana (the same name as we gave her in Daz
Studio), and the clothes rigs are parented under it. Select all the
clothes
rigs, except for the arm armor and the boots, and then shift-select Ana
to make it active. Set Extra Bones to Ignore and press Merge Rigs. The
clothes rigs disappear and the clothes meshes are now parented directly
under the character rig. The armature modifiers have also been changed
so the character rig moves the clothes as well.

The
armor has an extra bone that moves the cape. We want this bone to be
added
to the character rig. To this end, we change the value of Extra Bones to
Merge and press Merge, with the armor selected and Ana active. Whereas
the original character bones are located
on armature layer 1, the new bone appears on layer 2, but this can be
changed with the value of Extra Layer. The selection order is
important; if the rigs where selected in the opposite order, the cape
bone would appear on layer 1, and those of Ana's bones that do not
belong to the armor rig, such as the face and legs, would be on layer 2.
The
boots with high heels pose new challenges. We see that the feet are not
inside the boots, as they should. To fix this, first undo the strange foot pose by selecting all bones and press Alt-R.
Then select the boots and
shift-select the character (the armatures, not the meshes), and press
Copy Poses. The copies the pose from the last selected non-active rig to the active one.
The
feet are now inside the feet. With the character selected, press Apply
Rest Poses to make this the new rest pose for the feet.
It
sometimes happens that the feet mesh is inside high-heeled shoes but
the foot bones are outside. In that case we can often use Copy Bones
rather than Copy Poses. Copy Bones changes the bone locations in Edit
mode, without moving the mesh.
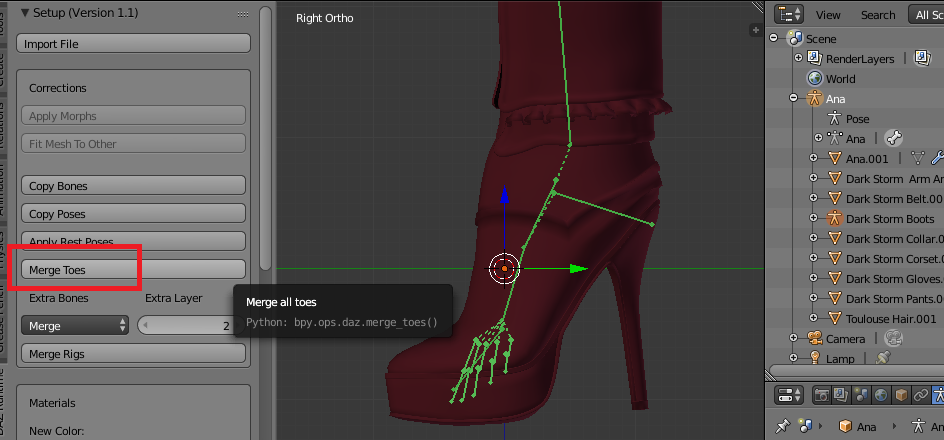
The
toe bones are not very useful when the feet are covered by shoes, and
usually not when the feet are bare either. To replace the individual toe
bones with a single bone, press Merge Toes.
Finally,
the character and boots rigs match and can be joined. Select the boots
and shift-select the character, press Merge Rigs with Extra Bones set to
either Ignore or Merge.
The two remaining buttons in
this section become active when a mesh is selected. Let us load a new
version of Ana, this time with the Mesh Fitting option set to Morphs. To
distinguish her from the previous version, Clothes Color was set to
blue.
There are now many shapekeys to the right. To apply all morphs to all selected meshes, press Apply morphs.
The
shapekeys are now gone, but the clothes do not fit perfectly, in
particular the corset. We can easily fix that if we can obtain a correct
version of the mesh. Here it is easy because the mesh imported with obj
or dae fitting works. In other cases one may be able to use Blender's
obj or Collada importer. We elaborate on this is the
problem fixing page.
Select the correct, brown corset and shift-select the faulty, blue corset to make it active, and press Fit Mesh To Other.
The
blue corset now fits. This button has side effects on the mesh used for
fitting, e.g. removing an armature modifier and object transforms, so
make sure that you don't need the mesh afterwards. A copy can always be
made first.
Materials
We
want to change the viewport color of the boots assigned by the
importer. Select the boots mesh (the rig is gone since the previous
step). In the Colors section, change New Color to something black and
press Change Colors. The boots are now black in the viewport.
One
can of course edit the material colors directly in the material
context. However, DAZ meshes often have several materials, and changing
the diffuse color many times is tedious. The button in the Setup panel
changes all materials of a given mesh at once.
Let us try to give Ana some green lizard skin. Select Ana_Mesh , change New Color to bright green, and press Change Skin Colors.
Ana
now turns green, but eyes, lips and eyelashes are not affected since they have different materials. Note
that this action changed the diffuse colors of more than ten skin
materials at once, something that would have been quite tedious to do
directly in the material editor. If we had pressed the Change Colors
button rather than Change Skin Colors, all of Ana would have turned
green, including eyes and lips.
The
diffuse color only affects the appearance in the viewport. When we
render the colors are controlled by textures, which are not affected.
Materials that do not have diffuse color textures are ignored by the
Change (Skin) Color buttons, so the rendered image is never changed.
Well,
we decide that Ana looks better with skin-colored skin, so undo the
last few steps until the skin color is back to normal.
A
DAZ character has many materials, and sometimes several of them are
identical. There is no reason to keep several copies of the same
material. The button Merge Materials combine identical material into a
single one. In this case, the Ears and Eyesocket materials turns out to
be identical to the Face material, so these three materials are
combined.
However, by combining materials you lose the
option to modify them individually later. E.g., the Merge Material
button sometimes combines the Lips and Face materials, which makes it
impossible to later add makeup by changing the diffuse map of the lips
only.
The
DAZ Importer does not necessarily handle makeup very well, but it can
be changed in Blender. Select the material that you want to change and
press Load Makeup.
In
the file selector, select an image file with the new makeup. The file
names usually hints about which body part the texture applies to.
And here the Lips material has been changed by adding a new image texture in the diffuse channel.
Instead
of using the Load Makeup button, in this case we could simply have
replaced the image in the first, diffuse texture. However, makeup can
also be things like tattoos and wounds, which may have specular and
normal maps associated to them, and then it can be convenient to have a
single button to press.
The
DAZ Importer creates materials for the render engine that was active
when the character was imported. However, what if you want to change the
render engine later? One option is to import the character again, with a
different setting for the render engine, but then you lose all work in
Blender. Instead you can update the materials for the active render
engine. The button is located at the bottom of the Materials group and
is labelled Update for BLENDER_RENDER or Update for CYCLES, depending on
which is the current render engine. Blender Game is treated like
Blender Render
Here
is a comparison of renders in Blender Internal and Cycles. Ana was
imported with Blender Internal as the active render engine, and the
materials were later converted to Cycles.
Disclaimer:
This button is of course not a general tool for converting between
Blender Internal and Cycles materials. It only works for materials
generated by the DAZ Importer. Some quality can be lost in translation,
so it is generally a good idea to import the character using the render
engine that you intend to use.
Morphs
The next group deals with morphs, in particular face
morphs. The word morph should be understood in a generalized sense. In
Genesis and Genesis 2 characters, face morphs are implemented as real
morphs, which translate into shapekeys in Blender. In contrast, Genesis3
has a face rig and facial posing is done with bones instead.
When a Genesis 3 character is loaded, the individual face bones can be
posed, but this possibility disappears when morphs are loaded, because
those are implemented as properties that drive the face bones, and a
driven bone can not be moved. To enable the possibility to tweak
expressions on top of the basic expressions set by properties, we can
add an extra layer of face bones which are parented to the driven bones.
To achieve this, press Add Extra Face Bones. The face bones disappear.
However,
the bones are not gone, only moved to a different layer. On layer 2 we
find the posable face bones. Layer 31 is populated by the original,
driven bones. That layer is best hidden because the bones on it can not
be posed anyway.
The
next step is to add some standard morphs, so we can pose the face.
Select the rig or the character, and press Load Face Units, Load
Expressions, and Load Visemes to automatically load the standard morphs
provided by DAZ. Of course, you don't need to load all types of morphs;
if know that your character will only display overall expressions, but
she will never talk nor need to display finer emotions, only Load
Expressions and ignore the other buttons.
In Genesis and Genesis 2 characters, where facial posing is
implemented with shapekeys, it is important that all morphs are loaded before the
character mesh is edited, e.g. by pressing the Merge Anatomy button
below. Real morphing relies on vertex numbers, so they must note be
changed before the shapekeys are created.
Three
new panels now appear at the bottom of the DAZ Runtime tab when the rig
is selected. In the Face Units panel we can set the values of the
individual face units. Note that negative values sometimes make sense. The Pin button to the right set the value of the
morph to one and zeros all other face units morphs; morphs in other
categories, such as expressions and visemes, are not affected. The Clear
Units button zeros all face unit morphs, and the Remove Units removes the face units drivers from this character.
The
DAZ importer knows about the Automatic Keyframe Insert button (the red
dot at the timeline). If this button is active, keyframes are
automatically inserted when any property in this panel is changed.
The
Expression panel works analogously. Genesis 3 only comes with a small
set of basic expressions, but Genesis and Genesis 2 have much more.
Finally,
the Visemes panel allows you to do lipsync. The Load Moho button
imports a moho (.dat) file which contains a lip sync animation. A free
tool that generates moho files is Papagayo, which can be downloaded from
lostmarble.com.
If
the rig is selected, the DAZ importer will automatically attempt to
load morphs to the associated character mesh. However, we can load
morphs to any mesh, provided that the vertex count matches the morph
file. Select the arm armor and press the Import Morph(s) button.
In
the file selector, navigate to the place where morphs for the arm armor
is located (this should be in one of the DAZ libraries), select a .duf
or .dsf file, and press Import Morph(s). The import options to the right
are
- Load All: Load the morphs from all DAZ Studio files in the
present directory. The "morph" is either a proper morph, corresponding
to a shapekey in Blender, or a pose for the rig.
- Prefix: Only load files whose names start with a certain
string, such as "PHM" (Partial Head Morph). In the illustration we could
have set Prefix to "JCM" to only load the four morphs starting with
that string.
- Use Drivers: Drive the value of the morph with an object
property of the parent rig. This property is displayed in the Custom
Morphs panel when the rig is selected.
- Category: This is used to group related morphs together.
- First Word Category: Ignore the Category setting and deduce
instead category from the first word in the file names. This is useful
if you load all morphs in a directory and the first word in the file
names is a body part, such as Eyes, Mouth, etc.
In this case, we disable Load All and enable Use Drivers, and
set the category to Armor since it will affect the armor rather than Ana
herself.
A
new panel called Custom Morphs appears at the bottom of the DAZ Runtime
tab when the armature is selected. It currently only contains the
single category Armor with the single property JCMLSD. The illustration
above shows the effect of setting this property to zero and one.
The
properties in individual categories can be hidden by toggling the
corresponding checkbox off. The buttons Open All Categories and Close
All Categories shows and hides all categories.
Press
Import Morph(s) again with the arm armor selected, but this time enable
Load All in the import options. All morphs in the given directory are
loaded, and appear in the Custom Morphs panel.
Cleary
the Custom Morphs panel can become quite cluttered with many morphs.
Therefore we can hide entire categories by disable the corresponding
checkboxes, which makes it easier to work with the unhidden morphs.
The
morphs correspond to shapekeys in the mesh. If the Use Drivers option
was enabled when the morphs were imported, as was the case here, the
shapekey values are driven by rig properties. One advantage of this is
that the morphs work with file linking; if the character is linked into
another file and the rig is proxified, the morph values can be animated
in the scene file.
Low-poly Versions
The next step is
to make a low-poly version of the character, which used to be called
proxy mesh in MakeHuman. The low-poly mesh can have several uses, e.g.
to speed up posing speed. The idea is to hide all the original meshes
while posing for maximum speed, and then hide the low-poly mesh and
unhide the original meshes when rendering.

- Iterations: The Daz Importer uses Blender's Decimate
modifier, set to Unsubdivide, and this number of iterations. The default
is 2. An even number of iterations generally works better.
- Apply Morphs: This is the same button as in the Corrections
section. Low-poly versions can only be made of meshes without shapekeys,
so this is convenient to quickly be able to apply all shapekeys.
- Add Low-Poly Versions: Add low-poly versions of all selected meshes. The low-poly mesh will be called mesh name + "_Lodn", where n is the number of iterations.
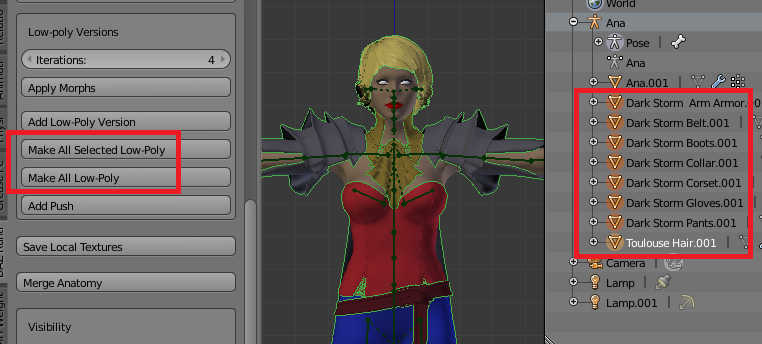
- Make All Selected Low-Poly: Replace all selected meshes by low-poly versions. The mesh names remains the same, and the original high-poly meshes are lost.
- Make All Low-Poly: Replace all meshes in the scene by low-poly versions.
- Add Push: Add a Push shapekey to the selected meshes. This shapekey move all vertices outwards 1 cm in the normal direction.

The low-poly
code uses Blender's decimation modifier, set to Unsubsurface.
Iterations is the number of iterations in the modifier. The default value 2,
which yields a mesh where the typical mesh spacing is twice as large.
It general it is desirable to use an even number of iterations, because
if Iterations is odd the faces will be rotated ninety degrees.
Press
the button Add Low-poly Version. A low-poly mesh is created and placed
on the specified layer. It has the same parent and armature modifier as
the original mesh. It also uses the same materials, so it looks the
same when rendered, with an important difference described below.
Here
is a comparison of the original and low-poly meshes. Ideally the number
of faces should be reduced by a factor four, but in practice this goal
is not reached because some faces are triangulated. Increasing the
number of iterations will reduce the face count further, but it will
become increasingly less efficient because more and more quad faces are
lost to triangles.
The
making of low-poly meshes is not restricted to the character herself.
Select all clothes meshes in the outliner and press Make Selected
Low-poly to replace these meshes with low-poly versions. This time we
set
Iterations to four, because these clothes are quite densely meshed.
The
low-poly character with low-poly clothes looks like this. The names of
the low-poly versions end with "_lodn", where n is the number of
iterations.
We
can now pose the low-poly version with high performance. When the pose
is perfected, we switch to the layers where the original meshes are
located, and render.
Here
is a comparison between renders of the original and low-poly meshes.
The low-poly versions could be usable as they are in real-time
applications, were it not for an unfortunate misfeature in the
decimation modifier: it does not respect UV boundaries. If we hide the
clothes and only render the low-poly character, we see that skin looks
ok except for some ugly white stripes. This happens when a seam in the
original mesh crosses in the middle of some faces in the decimated mesh.
Half of the face's corners then belongs to one UV island and the rest
to another, and the face is stretched over random parts of the texture.
Let
us hope that the Blender developers fix the decimation modifier so it
respects UV seams. Until that happens, texturing the low-poly meshes
must be done by hand.
The final button in this section
is useful for fixing clothes that don't fit, especially if the character
was imported with the Mesh Fitting setting set to Auto.
Here
is such an example., where the corset is clearly too tight for Ana. To
fix this, press the Add Push button. However, we should first apply the
existing shapekeys with the Apply Morphs button. Pushing moves each
vertex in the normal direction, and existing shapekeys are not taken
into account.
The
previous shapekeys are gone, and a Push shapekey appears instead. The
value of this shapekey is the normal distance measured in centimeters.
Change
the value of the Push shapekey until the corset is large enough. Adding
a push to a mesh does not fix every fitting problem, but sometimes it
can be a quick fix. You can of course also edit the meshes in edit mode.
Save Local Textures
If you have not already done so, now is the time to save the Blender file, because it must be saved before the next step.
So
far all textures are located in their original locations in the DAZ
libraries. If you intend to paint on the textures, or move the Blender
file to a computer where DAZ Studio is not installed (or all used assets
are not installed), you need local copies of the textures. Press Save
Local Textures to do so. This command creates a folder called "textures"
in the same directory as the blend file, and copies all used textures
there. The absolute file links to the textures are also replaced by
relative ones, so the textures will be found even if the blend file and
the textures folder are moved elsewhere.
Here is the folder with the textures used by Ana.
Merge Anatomy
In practice, this is almost exclusively done with
genitalia. In order to merge anatomy to the human, the anatomy must of
course first be exported from DAZ Studio. We therefore go back to DAZ
Studio and save a new version of Ana. To the nude mesh with hair we add
earrings and
genitalia. We also
add a top and shorts (hidden in the illustration below), primarily
because I am unsure how Blogger reacts to nudity.
Save
the
character ana-night.duf and export the corresponding
Collada file, ana-night.dae. Using the .obj format does not work with
genitalia, because the Wavefront exporter mysteriously merges the
genital and human meshes, which wrecks havoc for the DAZ importer.
Import the new .duf file into Blender and merge all rigs.
Load
all morphs that you need, both for Ana herself and also for her
genitals. This must be done before the anatomy has been merged, because
merging meshes changes the vertex number. Select the genitals and import
morphs.
Load
all morphs belonging to the genitalia mesh. I should have changed the
category from the default General to Genitalia, but forgot to do so.
Unfortunately, this mistake is not so easy to correct afterwards.
Now
select both the character and the genitals meshes, and press Merge
Anatomy. The importer figures out which mesh is a character by looking
at its fingerprint (the number of vertices, edges and faces), so
selection order is not important.
The
genitalia is now merged with the body mesh. The hidden crotch vertices
in the original body mesh have been removed, and duplicates along the
genitalia border have been removed, making the integration of the two
meshes seamless.
The
merged mesh keeps the genitalia materials and shapekeys. The shapekeys
are controlled by rig properties in the Custom Morphs panel, under the
category General (since I forgot to change that when the morphs were
imported).
Visibility
Parts of the skin is covered by clothes, but the character mesh is still
there right below. This may be a problem because the skin may poke
through the clothes in some places. The simplest solution is simply to
delete the hidden vertices. This is also the best option if you know that the
character will always be dressed in the same way, because removing vertices will increase performance. However, if Ana will
take off some of her clothes at some stage, it will look strange if there is no
body beneath.
Another
solution is to use mask modifiers, and the DAZ importer provides some
support to facilitate this. Select the mesh that will be covered by
clothes, normally the character itself, and press Create Masks And
Modifiers.
A
mask modifier is created for each piece of clothing (for each child of
the character's parent rig). The modifier uses a vertex group called
"Mask_" + clothing name, and the corresponding empty vertex groups is
also created.
A few DAZ assets are able to create the
vertex groups automatically; this is the case if the corresponding .dsf
file contains a "graft" structure. In particular, separate anatomy often
has this property. If the vertex groups are already created during
import, we could have pressed Create Mask Modifiers to create modifiers
using the existing vertex groups.
So
far the mask modifiers don't hide anything because the mask vertex
groups are empty. In edit mode, select the vertices that should be
hidden by the boots, and assign these vertices to the Mask_Boots vertex
groups. When we toggle back into object mode, the skin under the boots
is now invisible.
Repeat
the procedure for the clothes that cover a significant part of the
body, in this case the corset and the pants. Delete the superfluous mask
modifiers and vertex groups. If we hide the clothes in object mode, we
see the holes in Ana's body.
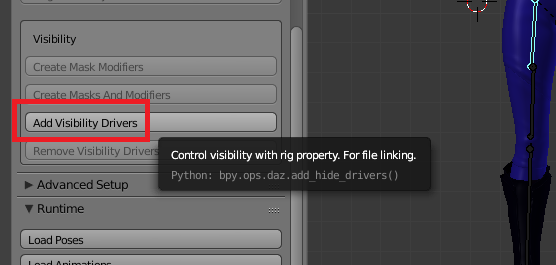
Select
the armature and press Add Visibility Drivers. Before doing this step,
all low-poly meshes were deleted except for Ana_Lod2.
The
Visibility panel appears at the bottom of the DAZ Runtime tab when the
rig is selected. There is an entry for each mesh where its visibility
can be toggled on and off. In the outliner you can see that the meshes'
visibility in the viewport and in render are now driven, and the
corresponding controls are purple. The mask modifiers are also
controlled by these rig properties, so hiding a piece of clothing turns
off the corresponding mask modifier.
Turn
off the visibility of all meshes except for Ana_Lod2. We can now pose
the character with moderate overhead. When it is time to render, the
low-poly mesh can be switched off and all the high-poly meshes switched
on. This procedure on works with file linking, because visibility is
controlled by rig properties.